Showing posts with label Cookie of the Month. Show all posts

Friday, December 23, 2011

Cookie of the Month: Gingerbread Cookies!

Because of time constraints (and waistline constraints) I haven't made many cookies over the past few months. But it's holiday season, so it's time to make cookies—and what kind is more appropriate for the season than gingerbread? I consulted my trusty Better Homes & Gardens recipe book:

5 cups all-purpose flour
1½ t. baking soda
½ t. salt
2 t. ground ginger
1 t. ground cinnamon
1 t. ground cloves
1 cup shortening
1 egg
1 cup molasses
2 T. vinegar

Beat shortening for 30 seconds. Add sugar; beat until fluffy. Add egg, molasses, and vinegar; beat well. Add dry ingredients (flour, spices, soda, salt) and beat well. (I was so glad I had my trusty KitchenAid for this step; adding 5 cups of flour to any recipe is too much for my poor wrists and elbows.) Cover and chill 3 hours or overnight. You'll end up with a stiff mass, like in the picture here.

Divide dough into thirds. On a lightly floured surface, roll each third of dough to a ⅛-inch thickness. (Keep remainder chilled.) Cut into desired shapes.

Baker's note: This is always the challenging part for me: trying to keep the dough even. At least with cookies, you don't have to spread the dough evenly, and when you have extra you can re-roll it. In that fashion, I would roll and cut, roll and cut, roll and cut, until I ran out of dough. The recipe said "Makes 60"; since I used bigger cutters, I probably had more around four dozen.
Place cut-out dough one inch apart on greased cookie sheet (or ungreased well-used stone, as I have). Bake in a 375° F oven for 5 to 6 minutes. Cool one minute; remove to a wire rack.

You end up with some really tasty cookies. While they were baking, and since I didn't know how they would taste, I thought they might need some glaze. I made a simple confectioners' sugar-and-water glaze and brushed it over some of the cookies. The picture to the left shows an unglazed on top, the glazed on the bottom. The cookies were actually pretty tasty without the glaze; nice and chewy, not too sweet and nicely spicy, and very addicting. This would be a great recipe to use for gingerbread houses, trains, or other construction—if you can bear holding off on eating them.

Final verdict: nom nom nom nom nom (five of five noms).

Thursday, March 17, 2011

Cookie of the Month: White-Chocolate Cherry Oatmeal Cookies

So I wasn't quite pleased with last month's Raspberry White-Chocolate Oatmeal Bars, thinking them a bit too sweet for my taste. (Astonishing, I know, that I'd find anything "too sweet.") I'd originally wanted to try using white chocolate chips in an oatmeal cookie, so when I had a little more time I went to my Better Homes & Gardens cookbook and headed to the drop cookie section. Their several variations on the Basic Drop Cookie included an oatmeal version, so I adapted it to get the following recipe:

¼ cup butter or margarine
¼ cup shortening
½ cup granulated sugar
¼ cup packed brown sugar
1 egg
1 teaspoon vanilla
2 tablespoons milk
1 cup all-purpose flour
½ teaspoon baking soda
1 cup quick-cook oats
½ cup dried cherries
½ cup white chocolate chips

Beat butter and shortening with electric mixer for 30 seconds. Add sugars and beat till fluffy. Add egg, vanilla, and milk; beat well. Add flour, soda, and oats to beaten mixture; mix well. Stir in dried cherries and white chocolate chips. You can see the resulting mixture is a little goopy, but full of good stuff.

Next drop spoonfuls of batter two inches apart onto a greased cookie sheet. You can see I was pretty generous with my spoonfuls, because I have a little scooping device that is perfect for drop cookies. A heaping scoopful gives me the right amount (1-2 tablespoons) of batter, and a little squeeze of the handle slides all the batter from the scoop onto the sheet. It's much easier than the old two spoons technique, since I only need one hand to use it.

Anyway, once you've got your batter scooped, bake in a preheated 375F oven for 8 to 10 minutes. Remove and cool on a wire rack. Eat!

And here's what they looked like after they came out of the oven and cooled a little bit. They were nice and chewy, which is how I prefer my cookies, and the mixture of flavors—oats, white chocolate, and cherry—was nice. But the balance was off; the cookies weren't very dense, and the oats seemed overpowered by everything else. So again (sigh): just a little too sweet.

Final rating: nom nom nom (three of five noms).

For now I'm giving up on white-chocolate combinations. Who knows what I'll come up with next month?

Thursday, January 27, 2011

Cookie of the Month: Raspberry White Chocolate Oatmeal Bars

A bake-sale fundraiser was coming up, which meant a chance to bake cookies without eating them all. (Not that I don't like eating cookies, but I really shouldn't eat all of them.) I was still thinking fruit and white chocolate, and maybe adapting an oatmeal cookie recipe to include some of my stash of white chocolate chips and some dried cranberries or cherries. Except I didn't have many dried cherries, and when I looked in the recipe book, I came across a recipe for oatmeal bar cookies instead.

If you're like me, you may think that making "bar cookies" is cheating. Like brownies, you make bar cookies in a single pan, then cut them up into individual bars. That doesn't really seem like cookies, which I think of as individually baked, but I was pressed for time, and who am I to argue the definition of "cookie" with the Better Homes and Gardens Cookbook? That's an "old faithful" of recipe books, so if they say bars are cookies, I was ready to go. I adapted their recipe for Apricot-Oatmeal bars to include my own favorite flavors. Here are the ingredients I used:

1½ cups all-purpose flour
1½ cups quick-cooking rolled oats
1 cup packed brown sugar
½ teaspoon baking soda
¾ cup butter or margarine
1 cup raspberry jam/all-fruit
1 cup white chocolate chips

First, mix the flour, oats, brown sugar, and baking soda together in a bowl. Then you cut in the butter/margarine with a pastry blender until you have very fine crumbs. This takes a lot of elbow grease, cutting until there are no big chunks of butter left. You can't warm the butter, or you won't get crumbs, it will be more like batter. (So it's a no-batter butter battle to get your crumbs.)

Next, take about two-thirds of the crumb mixture and press it into the bottom of an ungreased 9x13" pan. Spread the jam on top (it doesn't have to be even at this point) and bake in a preheated oven at 375F. Take it out and let it cool for a few minutes. You can see the result of this step, plus the texture of the leftover crumbs, in the picture to the right.

After the base has cooled slightly, smooth out the jam so it is evenly spread, then sprinkle the cup of white chocolate chips atop the base. Cover with the remaining crumbs and bake for another 15 minutes, until the top crumbs are a lovely golden brown. Take out of the oven and let it cool for quite a bit before you cut them into bars and serve. You can see the result is very gooey, so cooling makes them a little easier to handle.

So how did they taste? I actually found them a little sweet for my taste, which is very improbable if you know me and my sweet tooth. If I were to make these again, I might cut down on the brown sugar in the crust, reduce the amount of the raspberry jam, and/or add chopped walnuts to the top crumbles. (I thought about it here, but I try never use nuts in bake sale items.) I've made a similar item to this with caramel filling and semi-sweet chips and nuts which is super tasty, but I don't think I'll make this variation again, at least not with both white chocolate and jam.

Final verdict: Nom nom nom (three of five noms).

Friday, December 17, 2010

Cookie of the Month: White-Chocolate Cherry Shortbread

I know, it's more like "Cookie of the Season," since I haven't had an entry in this series since August. Number one, I've just been that busy, and number two, I haven't had an occasion to make cookies. Okay, maybe I don't need an occasion to make cookies, but I definitely need somewhere to distribute them besides my house (and by extension, my hips). It's the holiday season, so I needed to bring something to my band's holiday concert. I had two requirements: I wanted something that looked pretty, and I wanted white chocolate. A little Googling and I found this recipe at the Better Homes & Gardens site:

½ cup maraschino cherries, drained and finely chopped*
2½ cups all-purpose flour
½ cup sugar
1 cup cold butter
12 oz. white chocolate baking squares with cocoa butter, finely chopped
(or be lazy like me and get chips)
½ teaspoon almond extract
2 drops red food coloring (optional)
2 teaspoons shortening
white nonpareils and/or red edible glitter (optional)

1. Preheat over to 325F. Spread cherries on paper towels to drain well. *I actually avoided this by using candied cherries instead. No draining, and they mixed in pretty well.

2. In a large bowl, combine flour and sugar. Using a pastry blender, cut in the butter until mixture resembles fine crumbs. Stir in drained cherries and 4 ounces (⅔ cup) of the white chocolate. Stir in almond extract and, if desired, food coloring. Knead mixture until it forms a smooth ball. It's surprising, how you start with a completely crumbly mix of stuff you think can't possibly hang together, but after a little kneading it turns out into a reasonably sticky dough, like you see in the picture here. I did use food coloring, although I think it formed a little ball and didn't spread very well throughout the dough, so I wouldn't use it again. You get enough red color from the cherries anyway.

3. Shape dough into ¾-inch balls. Place balls two inches apart on an ungreased cookie sheet. Using the bottom of a drinking glass dipped in sugar, flatten balls to 1-1½-inch rounds. Here's a silly question: what other kind of glass might you use besides a "drinking glass"? Is there any other kind of glass, and if so, would it really be suited for squishing dough? I don't think so. Anyway, this is what the cookies looked like pre-baking.

4. Bake in preheated oven for 10 to 12 minutes or until centers are set. Cool for 1 minute on cookie sheet. Transfer cookies to a wire rack and let cool. My baking time was about 12 minutes, although the cookies didn't get that golden tint you expect from shortbread. Perhaps they needed another minute or two, or perhaps they just won't get golden with all the stuff in the dough.

5. In a small saucepan, combine remaining 8 oz. white chocolate and the shortening. Cook and stir over low heat until melted. Normally when I melt chocolate for dipping, I do it in the microwave, 20 seconds at a time at half power. This time it didn't work, and I had to go to the saucepan method and add extra shortening. The shortening makes the chocolate smoother and more suitable for dipping.


6. Dip half of each cookie into chocolate, allowing excess to drip off. If desired, roll dipped edge in nonpareils and/or edible glitter. Place cookies on waxed paper until chocolate is set. Mmmmm, I broke out my various mixes of holiday decorations. You can see I had some with nonpareils and sugar, and some with holiday "evergreens and berries." Both types tasted equally yummy. The cherry flavor was subtle, the white chocolate sublime, and the toppings added an interesting texture. You could taste the shortbread base underneath the cherry and white chocolate, but the texture wasn't very like shortbread at all. These were very smooth, chewy cookies, pure shortbread tends to be crumbly; again, I couldn't tell whether this was due to the extra stuff in the shortbread, or whether they needed a couple more minutes baking time. In any case, these were extremely tasty, and even though we had four dozen left at home after taking some to the concert, they were consumed within a few days.

All in all, I take away a little for the texture and give these cookies a nom nom nom nom (4 of 5 noms).

Tuesday, August 31, 2010

Cookie of the Month: Cookie Cutter Cookies

This week's treat is brought to you by the Department of Redundancy Department.

I had some frosting left over from a previous batch of cookies, and I promised some treats to my taekwondo students for the last class of the summer, so I thought I would look for a plain, sugar-cookie type recipe. But where to get the recipe? First I checked the dessert recipe book that I put together when I lived in London, as a fundraiser for the local American Women's Club, but they were all fancy cookie recipes. Then I remembered I had a couple of church recipe books given to me by relatives—I guess cookbooks are popular fundraisers—and there I hit paydirt. From a 1988 Centennial cookbook created by my aunt's church in the UP, I found this recipe for "cookie cutter cookies," and I was intrigued because it contained corn syrup, that most American of ingredients. So here it is:

1 cup butter or oleo (do they even make oleo anymore?)
¾ cup sugar
½ cup light corn syrup
2 eggs
1 teaspoon vanilla or ½ t. flavor extract
4 cups flour
2 teaspoons cream of tartar
1 teaspoon baking soda
¾ teaspoon salt

Mix all ingredients together. Shape into ball and wrap in plastic wrap. Refrigerate 1 hour.

Preheat oven to 350F. Use one-third or less of the ball at a time, and keep the rest in the fridge. Roll dough to a ⅛- to ¼-inch thickness. Cut out. Place one inch apart on a greased cookie sheet. Bake 10 minutes. Grease the sheet for each batch. Frost when cool.

Funny thing about these "cookie cutter cookies": they didn't really hold their cut shapes very well. I started out trying some nice animal-shaped cookie cutters, but as I tried moving the cats and elephants to the cookie sheet, they lost their ears and trunks and ended up looking like some kind of crazy mutant creature. I didn't want to scare my poor students, so I re-rolled the dough and grabbed a cup. If a plain circular cookie got a little warped in the transfer from rolling sheet to baking sheet, it wouldn't look so crazy. You can see from the picture to the right that the dough was kind of shiny and gooey.


So what would happen after I baked them for ten minutes? I wasn't sure, and not just because the dough was kind of gooey; for most recipes, I end up needing one or two extra minutes to get cookies nice and golden. But after ten minutes, I had a nicely done tray of cookies:


All that remained was to get my frosting, top them off, and give them a try. And while the gooey nature of the dough made it difficult to cut out, it resulted in a really light, chewy cookie that was still lightly crispy on the outside. Not only was the texture enjoyable, the flavor was very tasty, especially with the frosting.

So my final verdict? I have to subtract one because as "cookie cutter cookies" they didn't quite cut it. That gives a rating of nom nom nom nom (four of five noms).


Wednesday, July 21, 2010

Cookie of the Month: Pfefferneusse

Finally, I found the time to try making pfeffernuesse. Why pfeffernuesse? Why not pfefferneusse? It's pfun to say pfefferneusse. It sounds exotic, and with pepper in the recipe, it is kind of exotic. So I turned to my trusty Better Homes & Gardens cookbook:

4 cups all-purpose flour
½ cup granulated sugar
1¼ teaspoons baking soda
1½ teaspoons ground cinnamon
½ teaspoon ground cloves
½ teaspoon ground nutmeg
dash of pepper
¾ cup light molasses
½ cup butter or margarine
2 eggs
sifted powdered sugar

Combine flour, sugar, soda, spices, and pepper. In a saucepan combine molasses and butter; heat and stir until butter melts. (I actually used my trusty microwave, instead, to the same effect) Cool to room temperature, then stir in eggs. Add dry ingredients to molasses mixture; mix well. (I was sooooo glad to have my handy-dandy KitchenAid mixer for this step, because the dough got really, really stiff, and I saved my elbow from severe pain this way.) Cover dough and chill several hours or overnight. When it's thoroughly chilled, it will look very stiff and solid, as in the picture:

The next step is to grease a cookie sheet, and shape the dough into 1-inch balls. Notice the instructions don't say, "roll the dough." This is because the dough is so hard I couldn't use my trusty click scoop to grab an inch-worth of dough for me. No, I literally had to break off a piece of dough and warm it in my hands before I could roll it into something approximating the shape of a ball. It took me a bit of time, but I finally got 30 balls ready to bake, which you do in a preheated 350F oven, for 12 to 14 minutes. Take them out and cool on a wire rack. It was at this point I was really glad I had TSU translate "pfefferneusse" for me. I knew the "pfeffer" referred to the pepper, but I couldn't quite pin down "neusse," although it sounded familiar. I had an "ah-ha!" moment when he told me it meant "nut," because that's what these little cookies looked like.

There was one last step to finish these tasty little nuggets: Roll in sifted powdered sugar. Or, in my case because I don't own and am too lazy to use a sifter, unsifted powdered sugar. The result is a tasty little nut-shaped cookie that tastes a lot like gingerbread. It's dense but chewy, and not quite as sweet as my mom's gingersnap cookie recipe. But I loved the spicy flavoring—cloves are one of my favorite scents—and it would be very very easy to down half a dozen of these at one sitting. Luckily for my waistline, I took the bulk of these up to camp to share with my family.

For me, I give them the following rating: nom nom nom (three noms out of five).

Friday, June 25, 2010

Cookie of the Month: Meringue-Topped Bars

You may have noticed there was no Cookie of the Month for May. I didn't mean to skip it; my stomach said, "Yes, yes, yes, give us more cookies for May!" But my summer clothes said, "No, no, no! We will not fit unless you lose that winter insulation you so cleverly accumulated to keep warm!" So I managed to lose six pounds in the last six weeks by avoiding all sorts of sweets and logging my calories in a food diary: mission mostly accomplished. Plus, I discovered a strategy: band mini-camp was this week, so I could sample one cookie and send the rest in with Boy to feed the trumpet section.

But what to make? I thought about making Pfefferneusse, because the name sounds cool and I wondered what cookies with pepper would taste like, but then I looked at the recipe and it said "chill several hours or overnight" and I didn't have time to deal with that. What did I have time for? Bar cookies sounded about right—no shaping or rolling to deal with—so I browsed the section of my trusty Better Homes & Gardens cookbook and discovered this interesting recipe for Meringue-Topped Cookies. Topped with meringue? I like meringue fairly well, and I've never tried making it, so this could be fun. I dove right in:

1½ cups all-purpose flour
¼ teaspoon baking soda
¼ teaspoon salt
½ cup butter or margarine (I used Smart Balance butter blend sticks, easy to measure)
¾ cup packed brown sugar
3 eggs (divided)
1 teaspoon vanilla
¼ teaspoon cream of tartar
¾ cup granulated sugar
6 oz semisweet chocolate pieces/chips or two bars English toffee (I used chips)

Stir together flour, soda, and salt. For crust, beat butter for 30 seconds; add brown sugar and beat till fluffy. Separate egg whites from egg yolks; set whites aside. Add egg yolks and vanilla to beaten mixture; beat well. Gradually add dry ingredients to beaten mixture, beating constantly. Spread in an ungreased 13x9x2-inch baking pan. (The dough is rather gooey, so it's easiest to do this by hand.) Bake in a 350F oven for 10 minutes. When you take it out it should be golden brown like this:


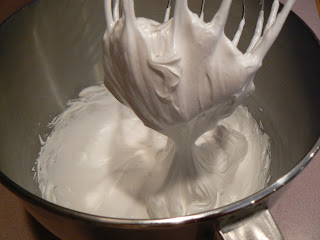
In the meantime, wash your beaters (and your bowl, if it's part of a mixing stand). For meringue, combine egg whites and cream of tartar; beat until soft peaks form. (I discovered high speed works better; "soft peaks" looks something like super high bubbles.) Gradually add granulated sugar; beat until soft peaks form.

For this part I was sooooo glad I have my KitchenAid 5-quart stand mixer, which is my favorite favorite kitchen mini-appliance, essential for making cheesecakes—or really, anything that needs blending, now that my wrists and elbows are old and tender and don't like working so hard to mix things up. My trusty KitchenAid made short work of the meringue, and soon I had fluffy white peaks, just like you would see atop a lemon meringue pie or just plain meringue candy.

Next, sprinkle chocolate pieces (which I used) or chopped toffee over hot crust. Spread meringue on top, getting it into all the corners. Bake 30 minutes more or until golden brown.

When mine came out of the oven it looked like this: golden brown and a little crispy. If you've ever had plain meringue candies, you know they are a little golden on the top, a nice crispy exterior with a chewy interior.

You are supposed to cut the treats into bars while they are still warm, or else they will harden and make cutting difficult. I let them cool about 10 minutes, so they weren't too gooey, and made easy cuts like you see here.

And the result? As you can see from the picture, we have a standard bar base, a little bit of gooey chocolate, and a layer of crispy/chewy meringue. This little corner was the only one I tried, and I thought it was just as well I wasn't keeping the rest around. With sugar in the base, sugar in the chocolate, and sugar in the meringue, it was extremely sweet. That doesn't have to be a bad thing, but in this case you have a very lightweight cookie with a very sweet taste. The bar base isn't very thick—it was a challenge to spread it out enough to cover the pan—and meringue has a very light texture. So this little cookie was extremely sweet without being very filling at all. And since it was actually one of the highest-calorie treats in the cookbook's cookie section, at 158 calories per serving (only the brownies surpassed it), this could be very very very dangerous. I ate one cookie and while it was extremely sweet, it felt like nothing in my tummy.

As for how the cookies went over? I'm not sure. Boy said they were acceptable, but instead of feeding them to his section they went to bribe the drum majors. We'll see next month if this proves to be an effective strategy, I guess—or whether they'll need Pfefferneusse to bolster their nefarious plans.

My rating for Meringue-Topped Bars: nom nom (two of five noms).

Thursday, April 29, 2010

Cookie of the Month: Italian Easter Cookies

Yeah, yeah, I know Easter was at the beginning of April, not the end. So sue me; I haven't come up with a better method for picking out new recipes besides thinking of nearby holidays. (Coming in June: Flag Day cookies! :p) And these Italian Easter Cookies were not only extremely delicious, but lots of fun to make. The recipe:

½ cup butter
¾ cup white sugar
3 eggs
1 t. vanilla extract
1 t. almond extract
¼ cup milk
¼ cup vegetable oil
3¾ cups all-purpose flour
5 t. baking powder

You can see that you end up with a dough that's a little bit sticky, similar to peanut butter cookie dough, but when rolled it actually has fewer cracks and breaks. This is probably due to the oil, and is a good thing, as you'll see from the shaping. Now the details:

1. Preheat oven to 350F and grease cookie sheets. (I used my Pampered Chef stones, which don't need greasing.)

2. In a large bowl, cream together ½ cup butter and white sugar until light and fluffy. Beat in the eggs one at a time, then stir in vanilla and almond extracts, milk, and oil. Combine the flour and baking powder, then stir into the wet mixture. (Note: I used my super duper mixer, which did a great job of mixing even dough.)

3. Roll dough into 1-inch thick balls. On a lightly floured surface, roll the balls out into ropes about 5 inches long. Tie into loose knots and place cookies 1 inch apart onto the prepared cookie sheet. (Note: I didn't bother with the floured surface; I made the balls, then rolled them into ropes by using my hands, and it seemed to work fine. Of course, the cookie knots look unpleasantly like dog poop, but I figured I'd get over that once they were baked.)

4. Bake for 5 minutes on the bottom shelf and 5 minutes on the top shelf of the preheated oven, until the bottoms of the cookies are brown. (Note: in my oven, which tends to match times in other recipes, I needed around 7 minutes each on top and bottom to get the golden brown color.)

5. After cookies are cool, dip them in icing. Here's the recipe it called for:

4 cups confectioners' sugar
½ cup butter, softened
1 t. vanilla extract
1 t. almond extract
3 T. milk
3-5 drops food coloring (optional)

Cream together the confectioners' sugar, butter, and vanilla and almond extracts. (You'll think this crumble couldn't possibly turn into smooth icing, but it does.) Beat in 3 T milk, one tablespoon at a time, then stir in food coloring if desired.

My frosting technique was simple: grab the cookie by the sides and dip it directly into the icing. I got good coverage that way, and a nice amount of icing. (Enough to make the cookies look less like dog turds, but not so much as to make it too sweet. Even so, I ended up with an extra cup and a half of icing.) The icing remained pretty tacky, so I made sure to use wax paper between layers of cookies in my storage container.

And the verdict? Oh, my. These were extremely tasty, much like sugar cookies, but with a super smooth texture. I actually tried one unfrosted, and it was lightly sweet, reminding me of those Stella D'Oro cookies that were advertised all the time in the 1970s. (I don't remember seeing them recently, but since they have a website I guess you can still find them. It's not like I spend time in the manufactured cookie aisle when I shop.) Frosted, they were addictive little knots; good thing Boy liked them as much as I did, or I might have eaten the whole batch by myself.

I'm already thinking about a cookie recipe for next month ... although I may have to take a break from the feature during the summer months, or I won't fit into my shorts. Maybe I'll explore the world of diet cookies? .... Naw, that's almost as wrong as having Cookie Monster call cookies a "sometimes food."

Final verdict: nom nom nom nom nom (5 of 5 noms)

Tuesday, March 30, 2010

Cookie of the Month: Irish Lace Cookies

Last month I initiated this new feature on my blog with the Lemon Snowflake cookie, the very tasty treat I had been given for Christmas. When it was time to come up with a recipe for this month, I thought since it was almost St. Paddy's Day, and I'm just a wee bit Irish, that I would look for an Irish cookie recipe. After searching around and discarding numerous regular-cookie-dyed-green recipes, I found this traditional recipe for Irish Lace Cookies. It's pretty simple:

½ cup butter, softened
¾ cup firmly packed light brown sugar
2 T. all-purpose flour
2 T. milk
1 t. vanilla extract
1¼ cup old-fashioned rolled oats

Cream the butter with the brown sugar until the mixture is light and fluffy and beat in the flour, the milk, and the vanilla; then stir in the oats.

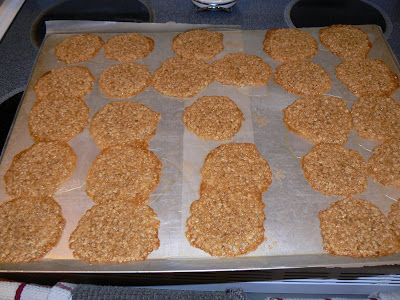
As you can see, the very small amount of flour produces a very gooey dough. You drop it onto the sheet in spoonfuls, and bake 10 to 12 minutes in a preheated 350F oven. After you take them out, you end up with something that is very flat and a little bit crispy:

Now, I pulled the recipe from the internet (usually a good source of recipes) and read through the comments. Many people had observed that these cookies were really difficult to remove from the cookies sheet, but a couple said they had used wax paper and had no trouble at all. So I topped my super-big fancy cookie sheet with some wax paper and plopped the cookie dough on top. Ungreased sheet, the recipe said. Bake until golden, the recipe said. Thus I did, and I got the following:

You probably can't tell from the picture just how devilishly the cookie is sticking to the wax paper, but it was so bad it resisted all attempts to scrape the cookie off, let alone "quickly turn the cookies upside down and roll them into cylinders." I ended up with bits of paper in my cookie, so I put the sheet back into the cooling oven to keep the cookies warm, and then scraped off crumbs a bit at a time. I took the crumbs and molded them into something resembling a cookie cylinder, and you can see the pathetic results below.

Now, these ugly-looking not-quite-cookies were actually very tasty: as you might expect, they had a strong, buttery caramel flavor from the butter and the brown sugar. But they were definitely not worth all the trouble I went through. I suppose I should try again and use a stone baking sheet instead—then I could scrape away until I had every single crumb—but April is coming soon and it's time for another new cookie. I wonder what's good for Easter...?

Final rating: nom nom (two of five noms)

Tuesday, February 23, 2010

Cookie of the Month: Lemon Snowflakes

As you may have noticed, I'm slowing down a bit on the blog. Part of it is that I'm spending more time working, and part of it is that I'm running out of quick-and-dirty topics to talk about. I'm not running out of travel photos anytime soon, but my quilt pictures are running low and the latter half of the alphabet hasn't been inspiring me. I've got plenty to review for Janespotting, but it's taking me a while to slog through some of these older classics. So I thought: what is something I love to do that I won't get tired of blogging about? I thought and thought for a while, and then I recalled the immortal words of one of our great philosophers, C. Monster, words by which I strive to live my life:

Work hard. Play fair. EAT COOKIE.

Yes, just for you, my thousands dozens handful of readers, I'm introducing a new feature to The Blathering: Cookie of the Month. Each month I will attempt a new cookie recipe (new to me, at least), and let you all know how it goes. Now, I love to bake and I'm pretty good at cookies, but I tend to rely on the same favorites all the time: snickerdoodles, peanut butter (especially topped with kisses), chocolate chocolate chip—all the usual drop cookies and rolled cookies, but nothing that unusual. For you, though, this will change! And first up is a very interesting treat, the Lemon Snowflake Cookie (LSC).

I was introduced to the LSC this holiday season, when one of my lovely and talented TKD students included a couple on a gift tray of tasty Christmas cookies. I nibbled, I said yum, I asked for the recipe:

1 Tablespoon grated lemon rind
¾ cup margarine
1 cup flour
½ cup confectioners sugar
½ cup cornstarch
½ teaspoon lemon extract
colored sprinkles or nonpareils (about one bottle worth)

glaze: ¾ cup confectioners sugar + ¼ cup lemon juice

Cream margarine, sugar, lemon rind, and extract. Add in flour and cornstarch; form and roll dough into a log.

It's easiest to do this atop a sheet of wax paper. As you can see from the picture, the dough has a texture that's very close to pie dough. It didn't want to hang together very easily, but it's very easy to roll fallen blobs onto the log ... at least in comparison to rolling a pie crust.


Roll log in colored sprinkles; wrap in wax paper and refrigerate overnight. Slice and place on a greased cookie sheet.

Even though my dough had been chillin' for almost a day, it still tended to have little pieces break off as I cut the slices. Luckily, it wasn't difficult to stick the pieces back on (although it marred the nice edges somewhat). You see one drawback of this recipe: it only made one tray of around 40 cookies.


Bake at 350F for 10 minutes. When cool, frost with confectioners sugar and lemon juice glaze.

The recipe I got wasn't clear about proportions for the glaze, so I checked a couple of recipe books and started with ¾ cup sugar to ¼ cup lemon juice. I had a stir a bit to get rid of the sugar lumps, but eventually got a consistency a little thinner than syrup. I used a basting brush to cover one side of all the cookies; I let that dry before flipping all the cookies and brushing the other side. And finally, I ended up with this:


The texture was much like shortbread, but the lemon gave it a bit of a tangy kick. They were very tasty—it was nigh impossible to eat just one—and didn't last long. Therein lies the drawback with this recipe: it was fairly labor intensive (lemon grating, glazing) and if you're the type of person who absolutely must have a cookie as soon as they're out of the oven, this might not work for you. But since the recipe contains no milk or eggs, and you can use margarine instead of butter, it might be good for those who need to avoid dairy products. It may even qualify as a vegan cookie, not that I really worry about such things.

Final judgment: Nom nom nom nom. (Four noms out of five. Fellow Cookie Monster followers should understand.)